
There is no denying that fine custom-made firearms are works of art. Built by some of the best gunsmiths, they are stocked with the finest grade woods and have metalwork that leaves you in awe. All of these high-grade guns have one thing in common. Screw Timing.
Screw timing is when all of the screw slots go in the same direction, usually parallel to the barrel of a rifle or grip of a handgun. Screws are timed for aesthetics as well as functionality. This is done one of two ways; chucking up the screw in the lathe and removing material from the back of the screw head, or drilling the countersink deeper. Both of these methods allow the screw to rotate further turning the screw slot to the desired position. Let me explain.
Affiliate Disclosure: This article may contain affiliate links. When you use these links, I earn a small commission from each sale generated at no cost to you. This commission helps me continue to put out free content. I work a full-time job that I am very happy with; therefore, I don’t need this commission and am not obligated to speak highly of any product. Everything written is my own opinion: the good, the bad, and the ugly.
Practicality
The timing of screws is mostly done for looks. It is very appealing to the eye to see every screw slot perfectly aligned. It shows the amount of craftsmanship that went into the entire firearm, usually bringing on a statement such as “They even made the screws line up!” We can all agree that doing this makes a firearm look that much better, but is there a practical purpose?
Screw timing is used in many firearms to prevent users from over-torquing screws and applying too much pressure to the affected part. A great example of this is the use of lock screws of firearms like the Browning Auto-5. Parts like metal buttplates will be timed solely for aesthetics, but actions screws are the opposite. The amount of torque applied to your action screws can greatly affect accuracy. Timing the screw so that the screw slot goes the same direction every time it is reassembled assures you that you are not under or over-torquing your screws putting inconsistent and unneeded stress on the action.
So yes, screw timing does have a practical purpose. Accuracy is consistency, consistency down to your action screw torque. The best riflemakers in the world take this into account and find the most accurate torque setting for each individual rifle and time the screws accordingly. Next level attention to detail.
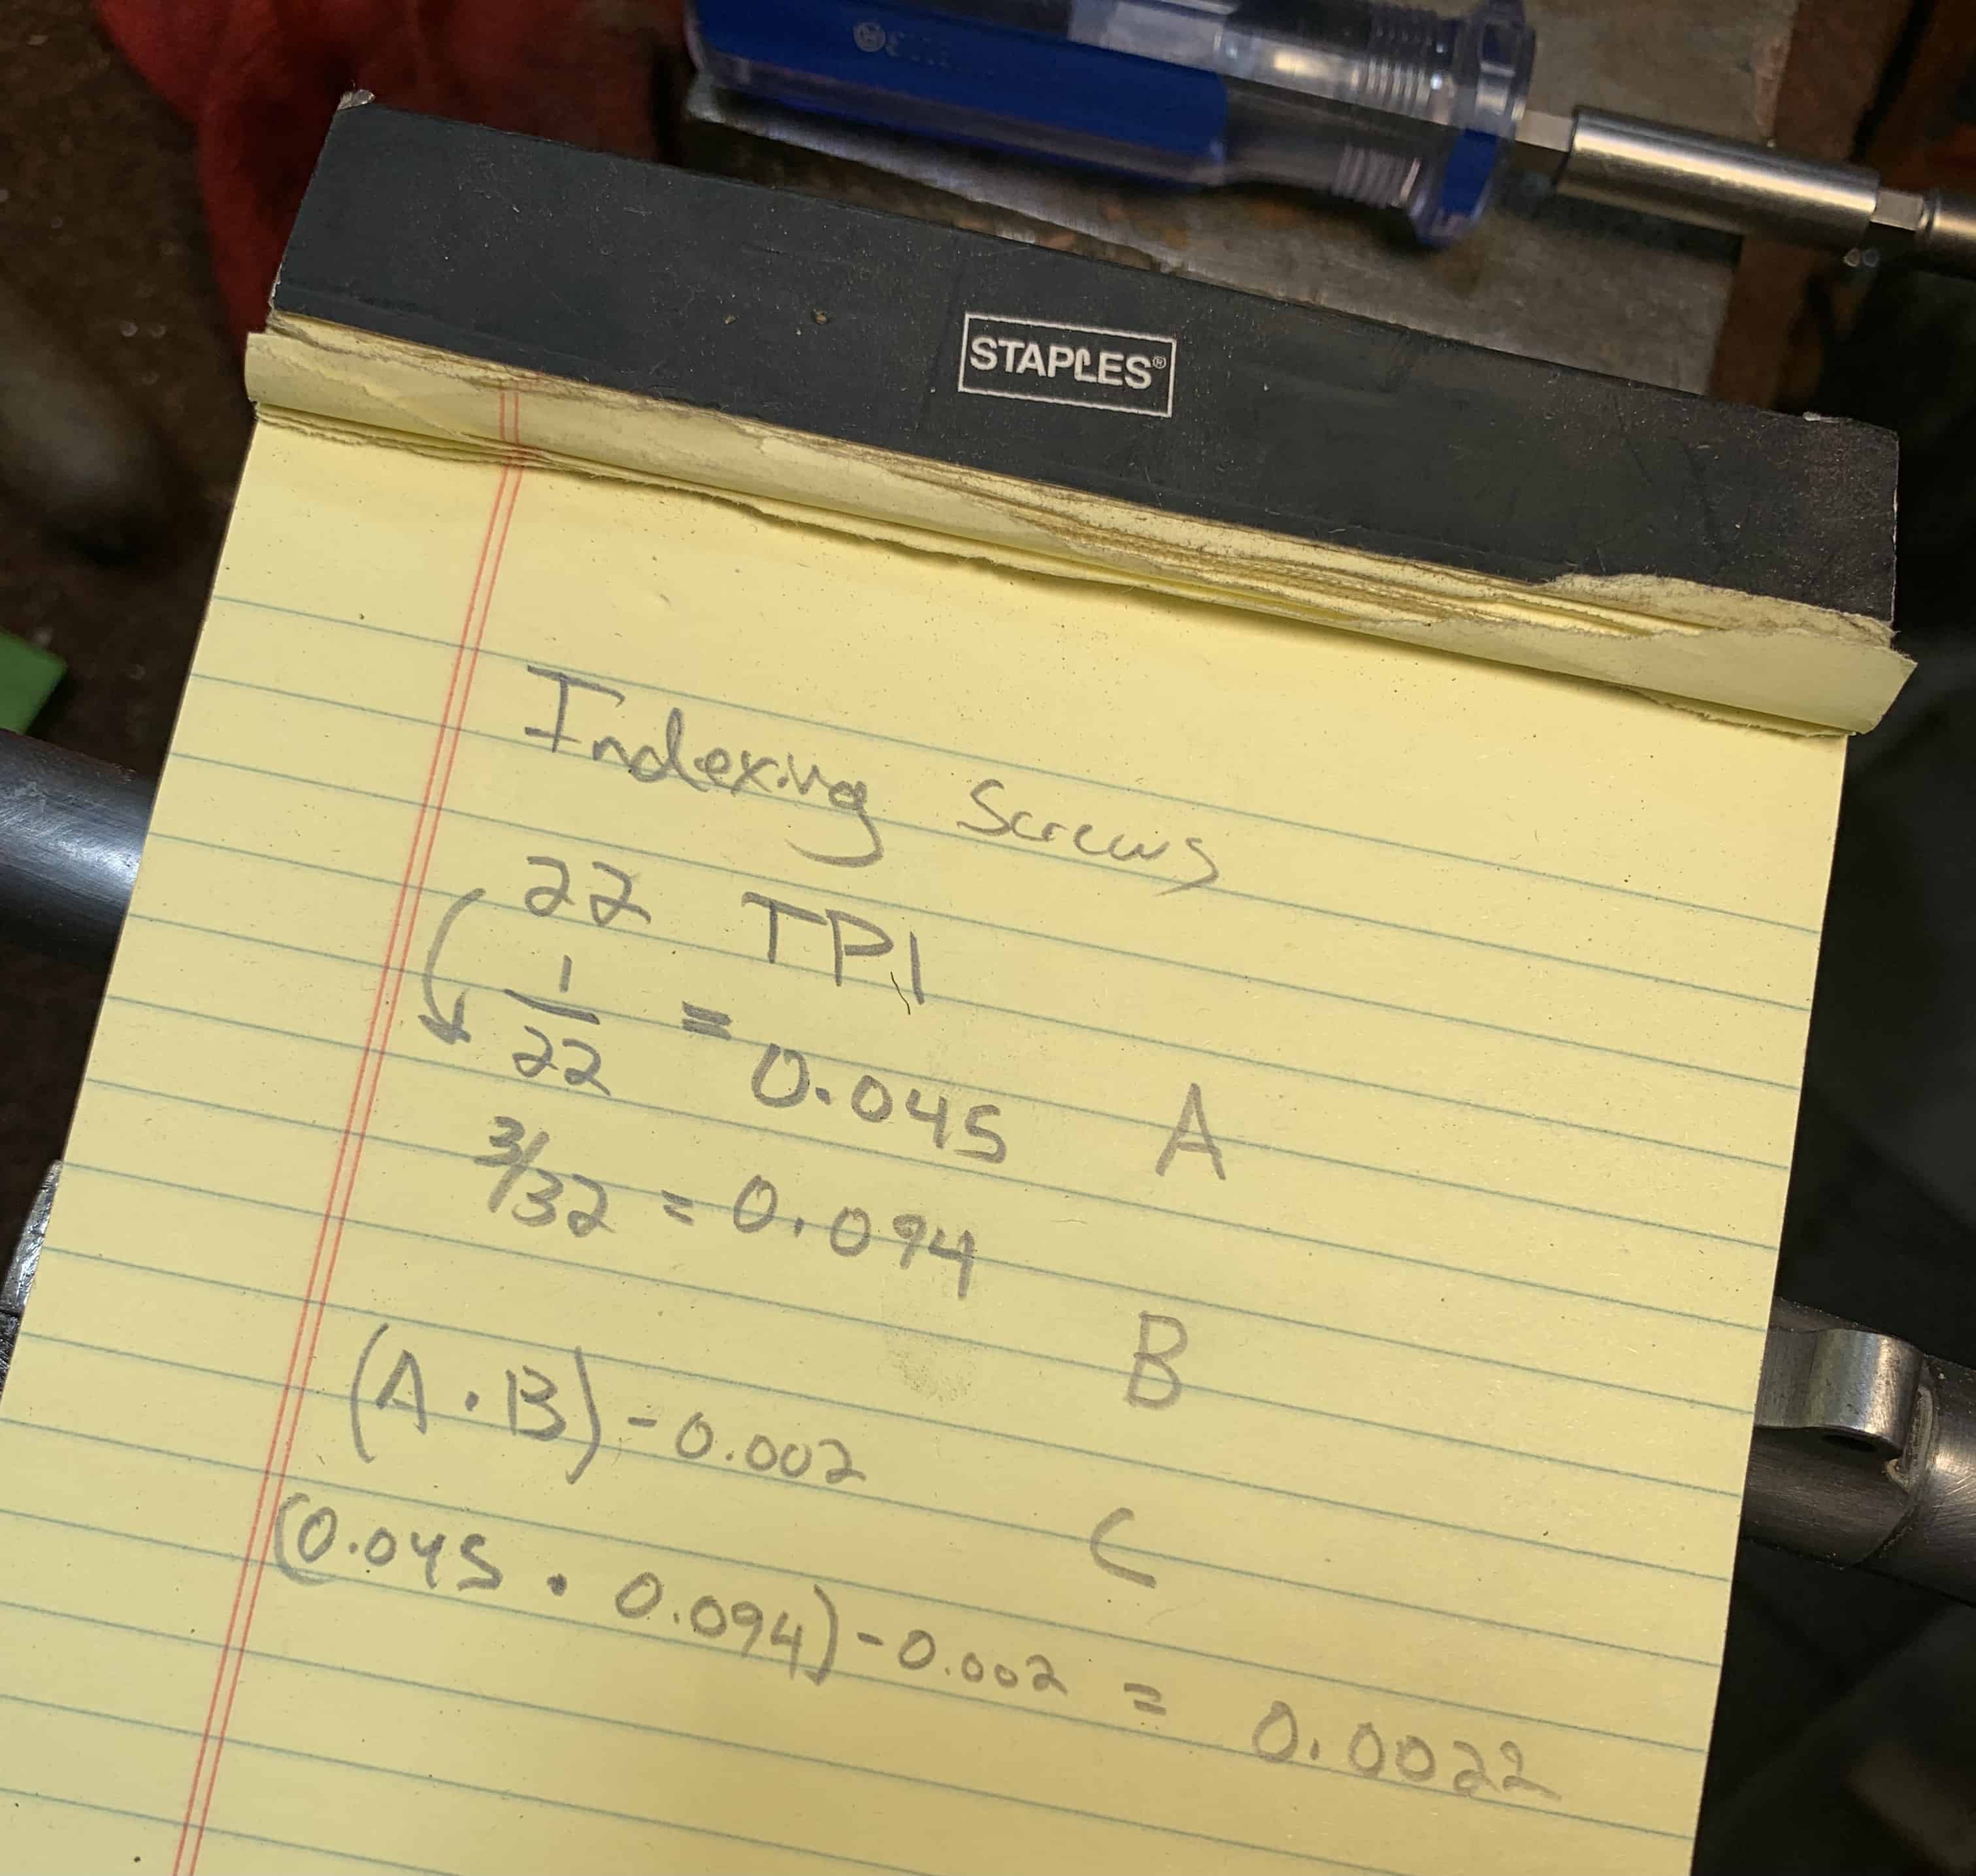
The Magic Formula
(A x B) – 0.002 = C
The formula is a pretty simple one. I break it down into three parts to simplify it even further.
A – Is one divided by the threads per inch(TPI) of the screw. Find the TPI by using a thread pitch gauge. This example is for a Mauser action screw that has 22 threads per inch.
B – This is calculated as a fraction of the amount of rotation you want the screw slot to make. This number should never be above 1/2.
C – Multiply A * B then subtract 0.002. This 0.002 is accounting for any crush that might happen as you tighten the screw. This also gives you a little room for error when machining. I round this number to the nearest thousandth (X.XXX). This is the amount of metal to be removed.
A = 1 / TPI = 1 / 22 = 0.045
B = Fractional Rotation = 3 / 32 = 0.094
C = ( A x B ) – 0.002 = ( 0.045 x 0.094 ) – 0.002 = 0.002
C = the amount of material you will remove from the back of the screw head.
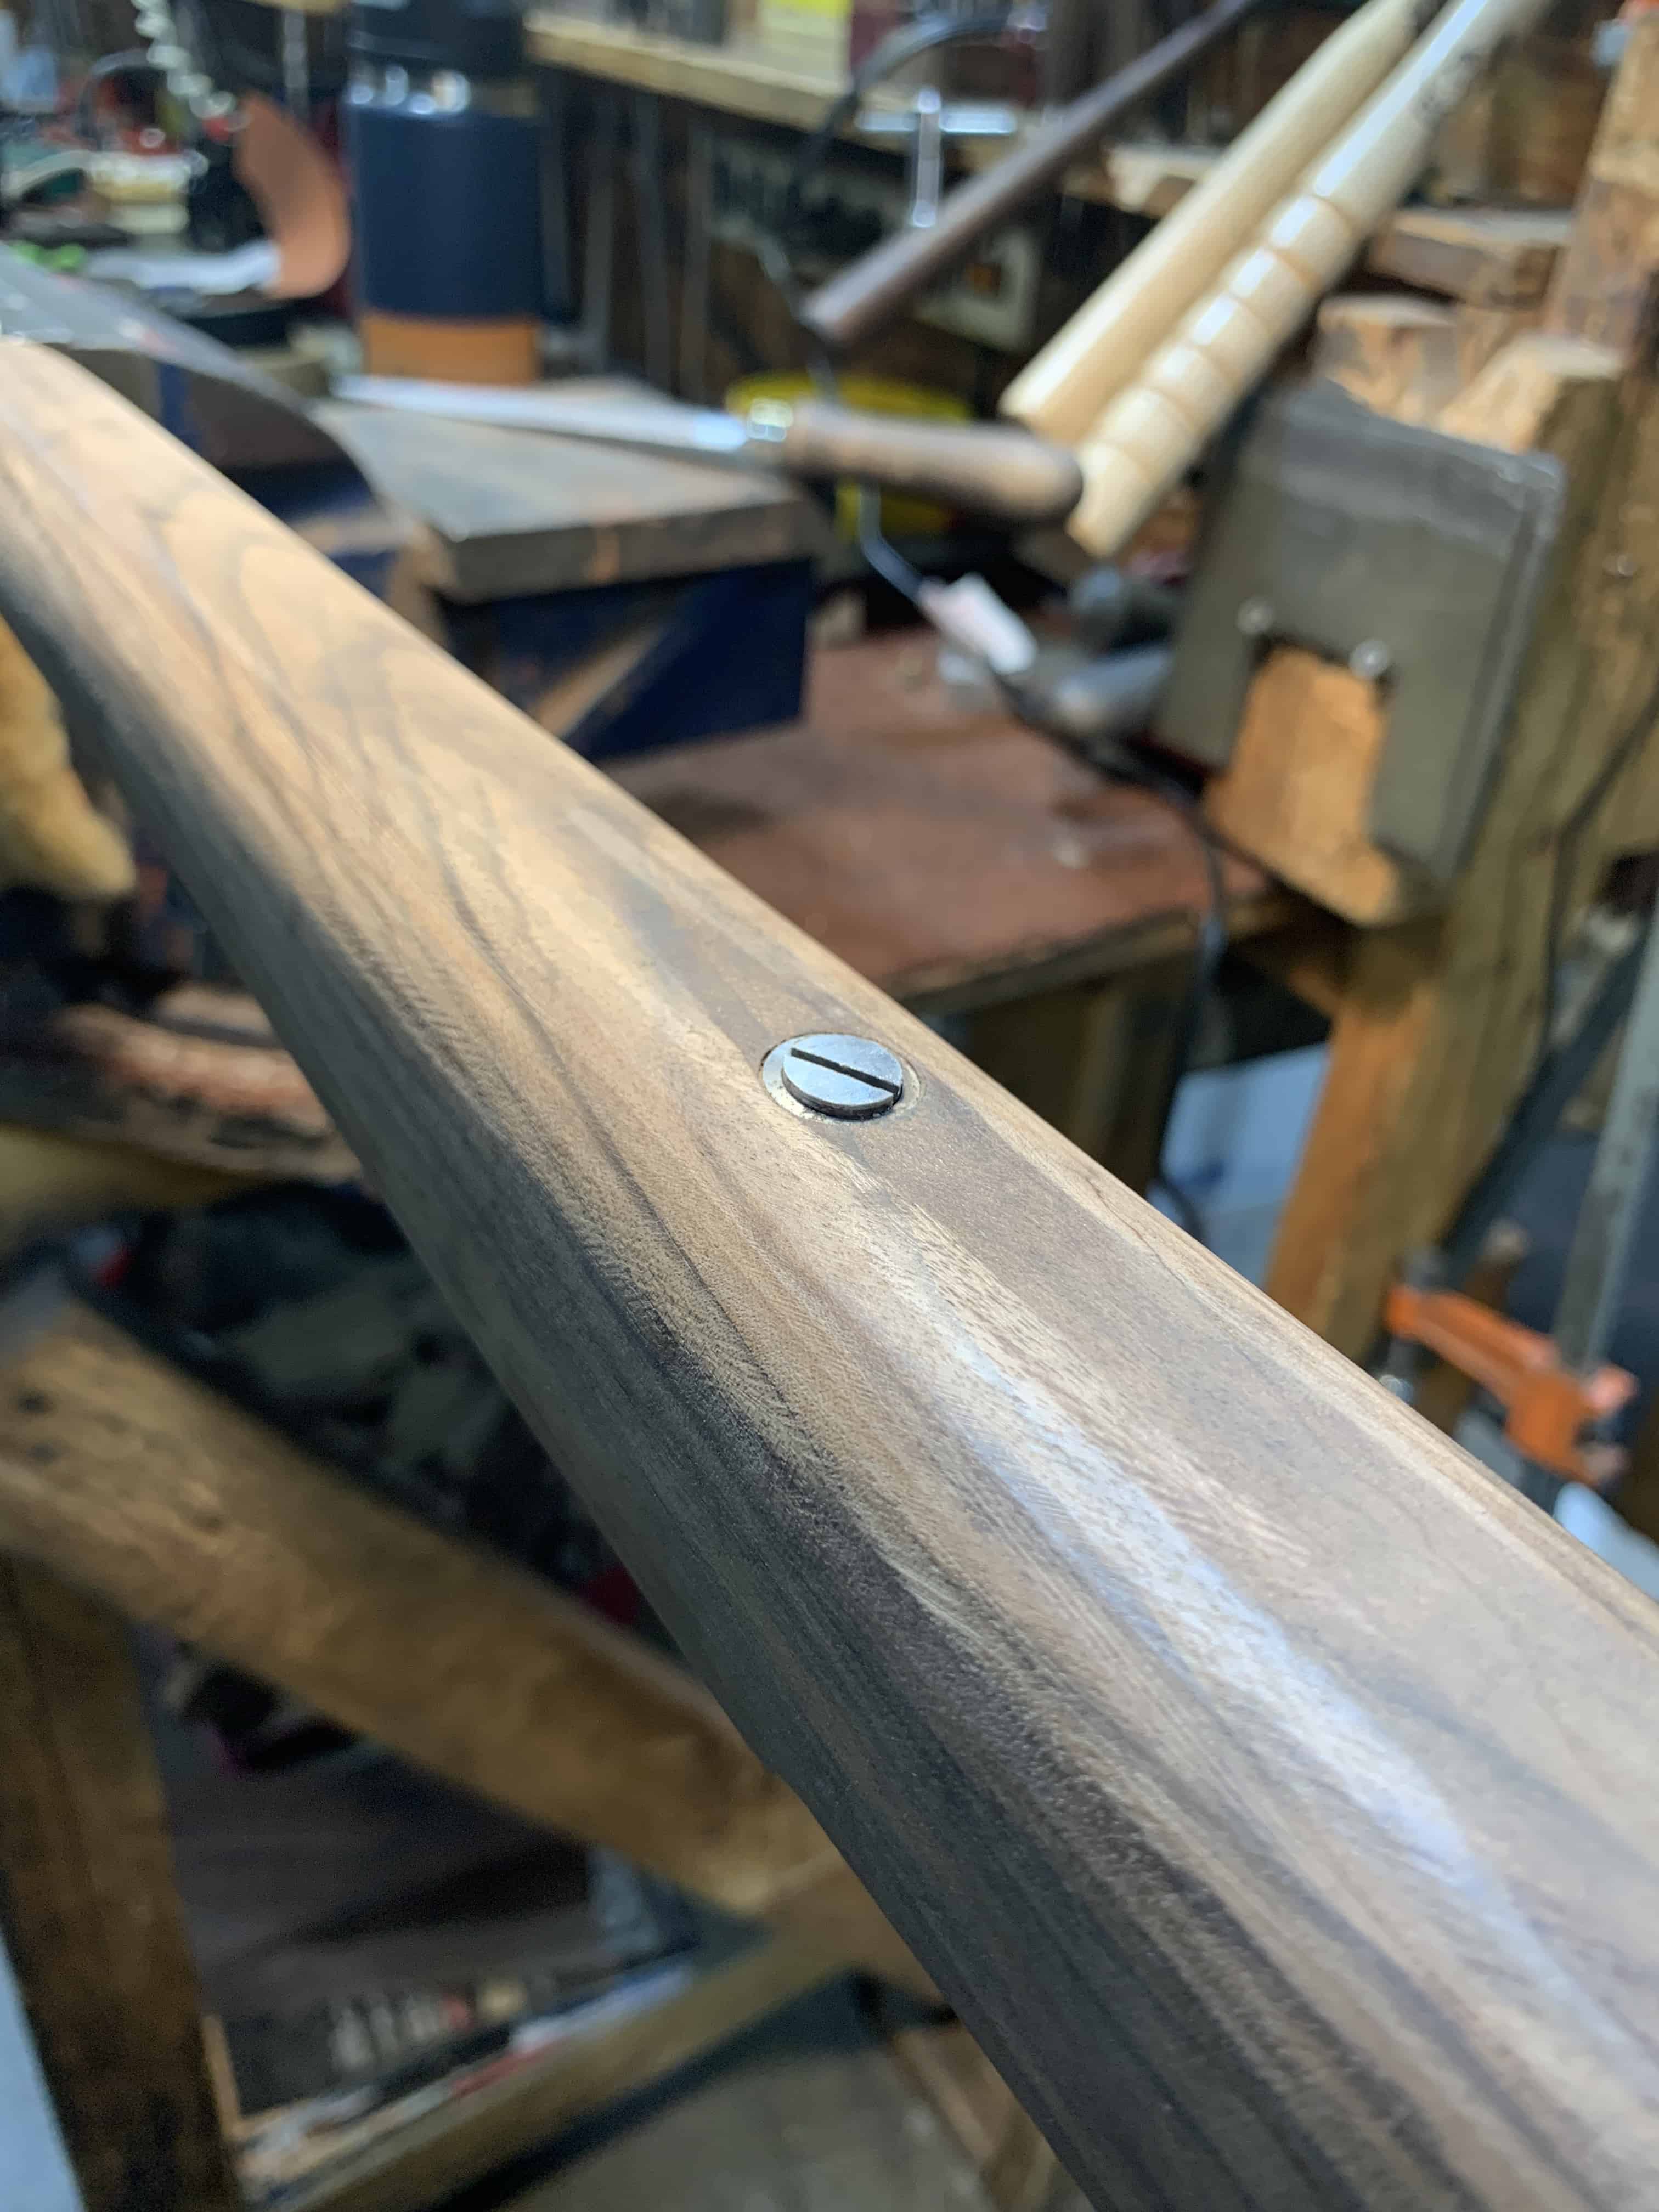

*Notice that the timing of the screw was done prior to blending the screw with the contour of the stock.
Use coupon code KTG10 to get 10% off your order of $150 or more at Brownells.
How to Time a Screw
Timing a gun screw is not nearly as hard as it may seem.
There are two methods of doing this and both are doing the same exact thing. Each utilizes the formula above to determine how much material must be removed.
1. Removing metal off of the back of the screw head. This is by far the most popular way of timing a gun screw. insert the screw into the lathe and remove a pre-determined amount of material off of the back of the screw head. There are many ways to accomplish this setup, but the easiest way I have found is as follows.
Assuming your tailstock is aligned, insert a drill chuck into your tailstock and put the screw into the drill chuck. Next, run the tailstock up to the lathe chuck and tighten it down on the head. Care needs to be taken at this point as it is easy to over-tighten the lathe chuck and damage the screw head. By doing this it is quick and holds your screw head square to the screw body. This works with any length screw and alleviates the need to reconfigure your tool post. See the picture below.

2. Drilling out the screw countersink. This method can be used to time a screw but is not the best way to do it. Most of the time, only a few thousandths of an inch of metal needs to be removed. It is very hard to be precise when doing it this way, especially if there is any kind of angled shoulder to the countersink.
Take Your Work to the Next Level
I challenge every gunsmith reading this to give it a try if you haven’t before. Go onto your favorite custom gunmaker’s website and look at their firearms, noting the directions of their screw heads. While it may not be the most important aspect of a custom gun, it shows that you paid attention to every detail. This will add to your overall product and help give it the professional appearance it deserves.
Let me know how your experiences with timing a screw go!
For other articles on various gunsmithing topics click here!

Written by: Kurt Martonik
Kurt is a Gunsmith, Reloader, Hunter, and Outdoorsman. He grew up in Elk County, Pennsylvania, where he became obsessed with the world of firearms. Following high school, Kurt enlisted in the United States Air Force as a Boom Operator, where he eventually rose to the position of Instructor. After his military service, he attended the Colorado School of Trades(CST) in Lakewood, CO for gunsmithing. Following graduation, he accepted a job at C. Sharps Arms in Montana, where he worked as a full time stockmaker and gunsmith.