
Recutting the checkering on a refinished rifle stock can give it a whole new appearance and bring it back to life. It is usually the last step in a proper stock refinishing job and is the difference between an amateur and a professional job.
To recut the checkering on a rifle stock, you go over each line with a checkering tool with a single-line cutter installed. Each line must be cut multiple times until the desired depth is achieved. Once the pattern is cut to full depth, the finish is applied.
Recutting the checkering on a gunstock is very satisfying and can be done at home with a little practice.
Affiliate Disclosure: This article may contain affiliate links. When you use these links, I earn a small commission from each sale generated at no cost to you. This commission helps me continue to put out free content. I work a full-time job that I am very happy with; therefore, I don’t need this commission and am not obligated to speak highly of any product. Everything written is my own opinion: the good, the bad, and the ugly.

What is the Purpose of Checkering?
Gunstock checkering provides a good gripping surface for the shooter and improves the handling characteristics of the gun. The diamond patterns furnish a textured area for a more secure grip during different weather conditions.
Checkering is also used as a decorative feature on some firearms. Some very elaborate patterns can be found on higher-end guns to make them more aesthetically pleasing. Skeleton grip caps are a perfect example of a decorative checkering application, as there is no need for a better grip on the bottom of a pistol grip.
Checkering can be found on pistols, rifles, and shotguns and has been encountered on some of the earliest flintlock rifles and pistols.

Why Recut Checkering?
Aside from doing it to complete a proper refinish on a gunstock, there are four main reasons someone might want to recut the checkering on their firearm.
Wear and Tear. The checkering on an old gunstock will sometimes be in pretty rough shape. The tops of the diamonds are delicate and are easily dented and even broken off occasionally. This damage reduces the effectiveness and usefulness of the checkering pattern.
To Upgrade a Stock. Some people just aren’t happy with the checkering on their gun and may choose to upgrade it. It is very common to recut the stamped-in checkering patterns found on most factory rifles today. In my opinion, this makes a huge difference in the appearance of a rifle.
Repairing. Repairing damaged portions of a checkering pattern is another common reason one may recut a checkering pattern. This can be damage to the checkering itself or the stock entirely. Grafting in a piece of wood to repair a damaged section can be hidden by a checkering pattern pretty well.
Personal Preference. Sometimes a gun owner just wants something different. And they may choose to recut the checkering to satisfy their own curiosity. There really is no wrong answer here.
How to Start Checkering a Gunstock: The Fundamentals
There is one important thing to consider before recutting the checkering of your old rifle. Will it hurt the value of the gun? Recutting the checkering does not mean that it will be worth more money. In fact, it may mean the opposite. In my article, Does Refinishing a Gun Hurt Its Value? Or Help It? I cover this topic in detail. If interested, read the entire article here.
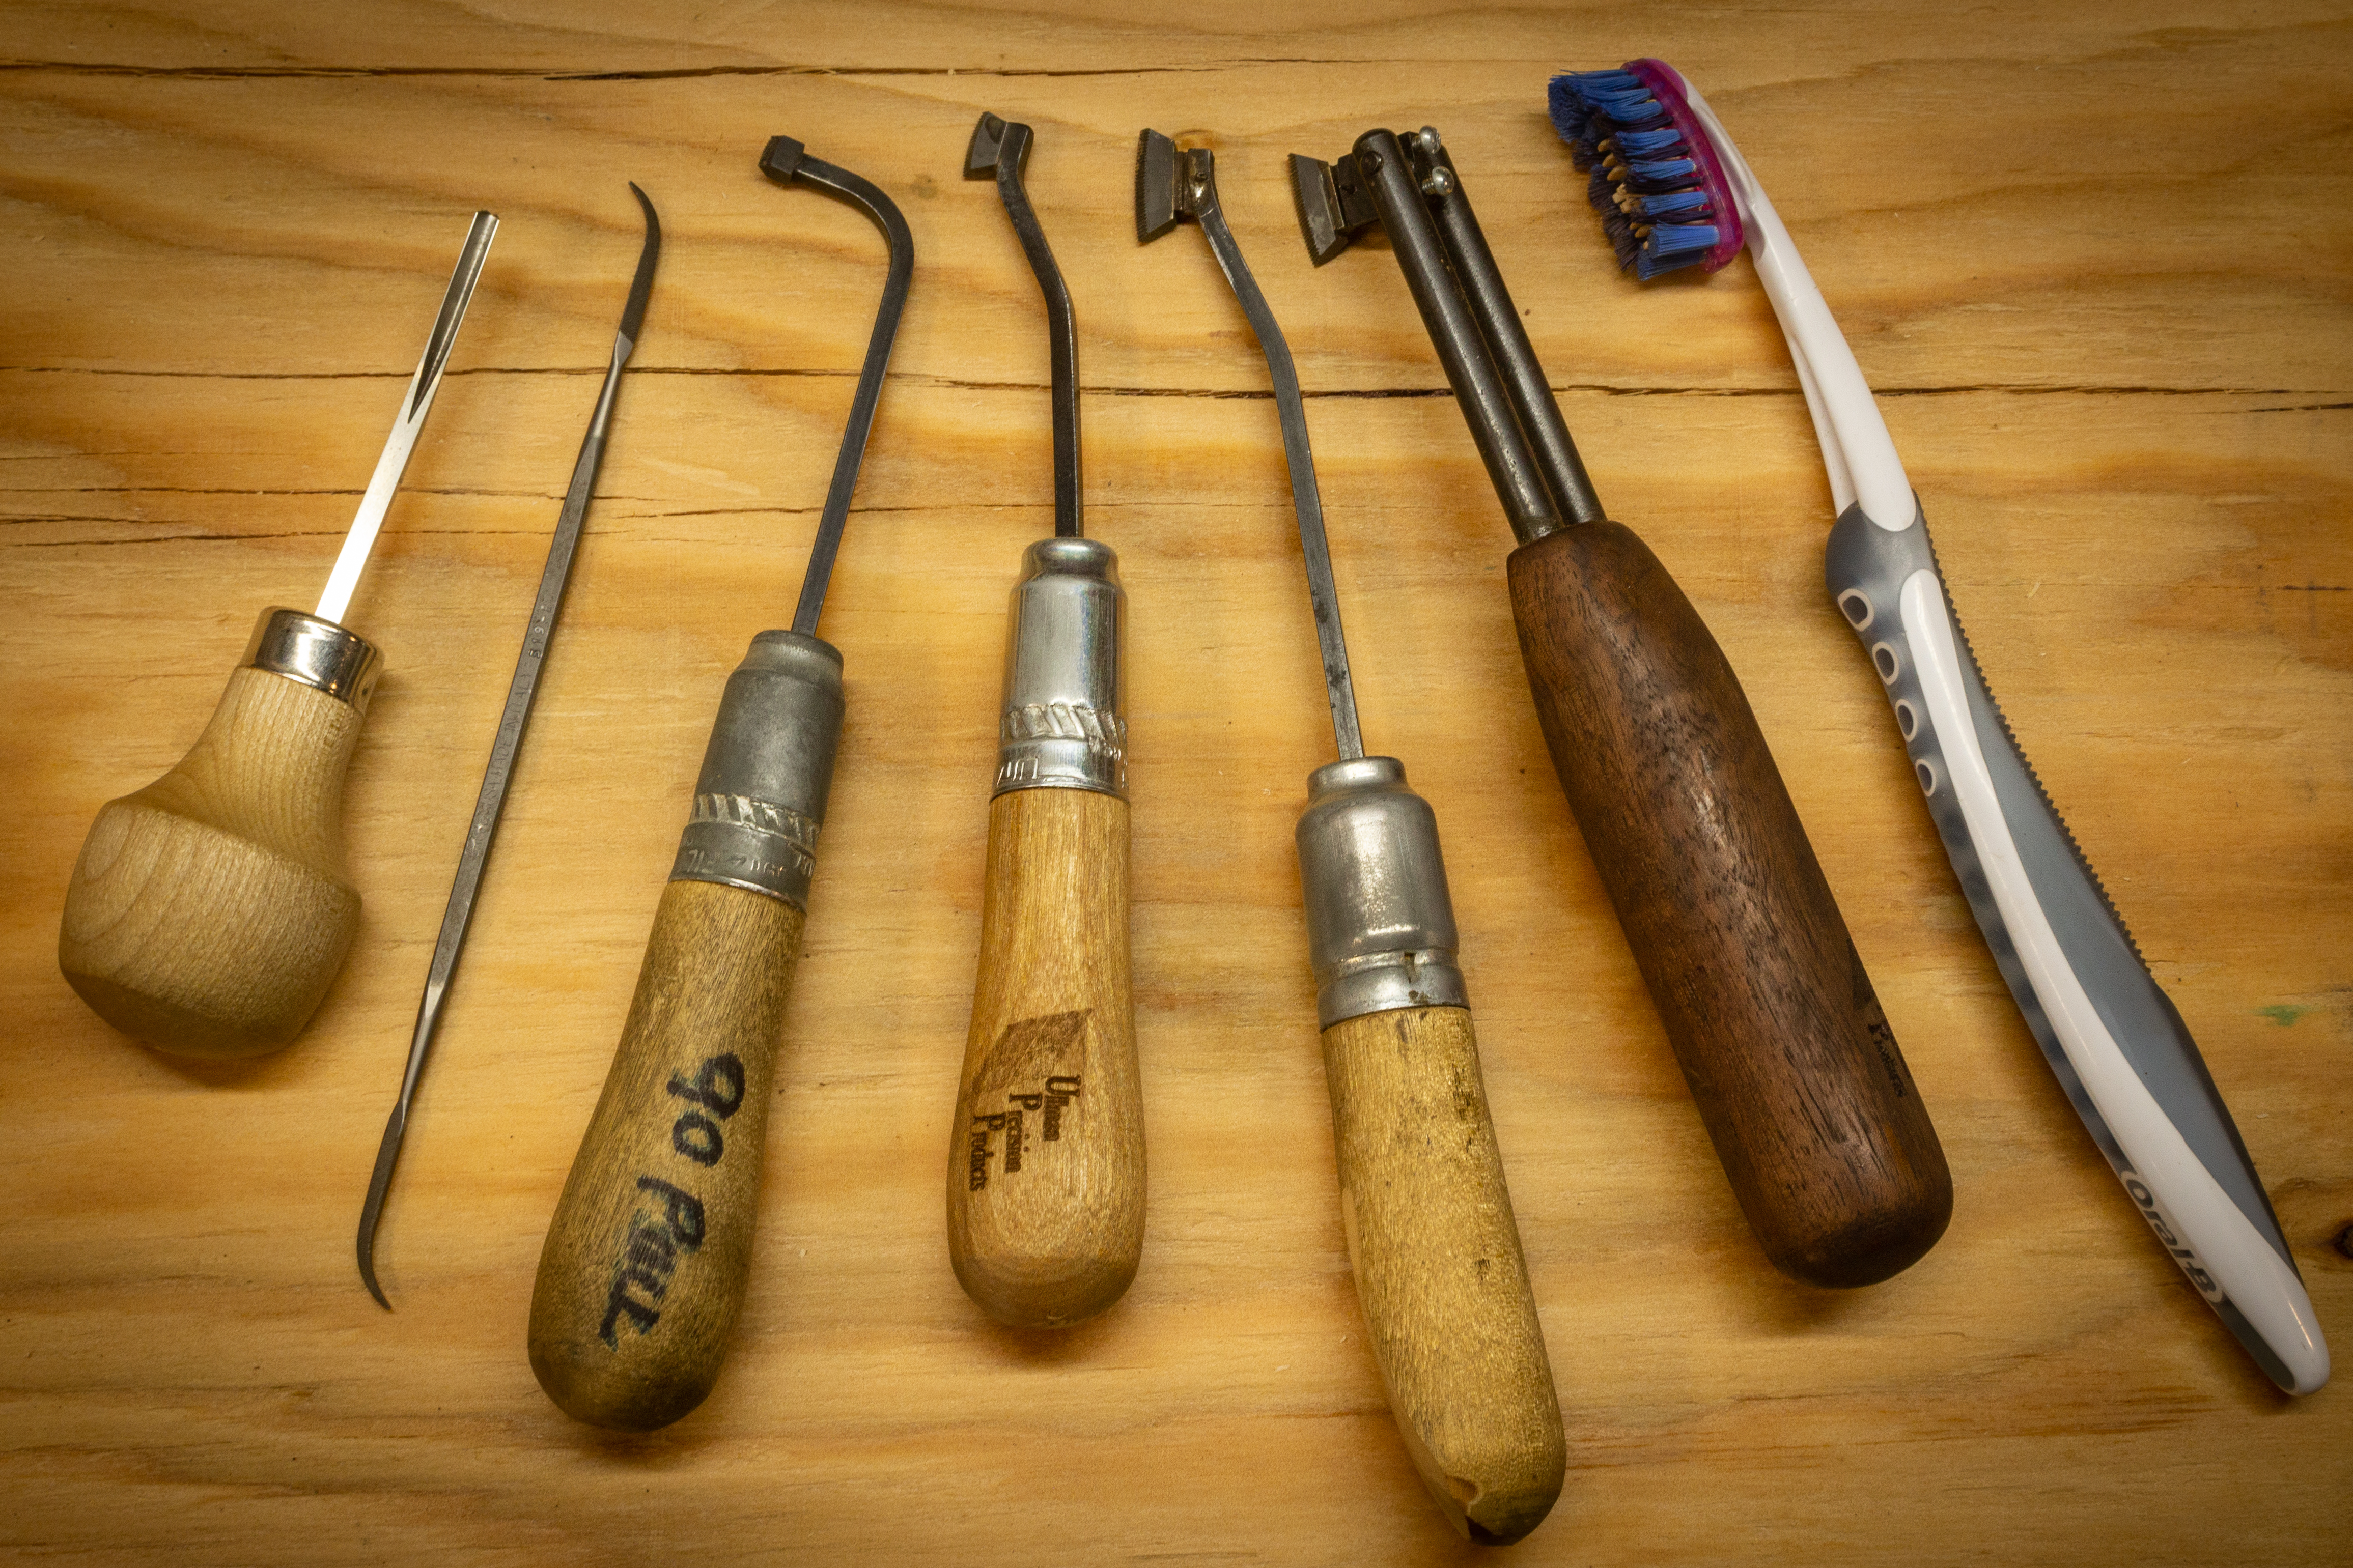
Tools Needed to Recut Checkering
Fortunately for us, very few tools are needed to recut checkering on a rifle stock. There are six tools that I use when recutting checkering, but someone just starting out could do it with just two.
I will be listing two different brands of checkering tools; Ullman Precision Products and Gunline. These are the two brands that I have the most experience with.
Ullman Precision cutters are made of carbide and are top-of-the-line. They will last a lot longer than the typical cutter head but can be more easily damaged when dropped due to their carbide composition.
The Gunline cutters work great as well, but they become dull after a couple of stocks. Unless you are buying a complete set, the Gunline cutters will need to be paired with handles.
Below are the two must-have tools for recutting a checkering pattern.
The 90-degree single-line cutter: This is the workhorse tool for recutting checkering. It cuts a 90-degree edge and is used for most checkering applications. I personally have two to three of these on hand of various sizes; 3/16″, 3/8″, and 5/8″. However, you really only need one when starting out, the 3/8″. The different lengths help keep lines straight in different situations and will also make cutting a pattern more efficient. The different sizes listed above are available through Ullman Precision Products, but the standard gunline cutter listed here is a good one-and-done cutter.
The 90-degree right-angle cutter: This tool cuts as you pull it toward yourself and allows you to get into the really tight areas near the borders. The “right angle” refers to the handle angle, which gives the user more visibility when cutting. When recutting a checkering pattern, I will use the larger cutters to cut the majority of the depth, but won’t go up close to the border until I switch to this tool. Here is the Ullman Precision one that I use now. If you want to go the more affordable route, the Gunline version is this 90-degree cutter head with the H-3 handle.
Use coupon code KTG10 to get 10% off your order of $150 or more at Brownells.
Optional Tools:
60-degree single-line cutter: The 60-degree single-line cutter is very useful for cutting the initial pass on a damaged pattern. The steeper angle of the cutter will stay in the bottoms of the lines better and help you get started. I don’t use this every time but find myself reaching for it on occasion.
Border cutting tool: Border tools come in various shapes and sizes and can be very useful when recutting a checkering pattern. Personally, I prefer using a single line 60 or 75 degree cutter to do my borders but have used different border tools to match original patterns.
Riffler File: The Riffler file is great for cleaning up old checkering as well as getting into tight spots near the borders. I’ll admit that I didn’t use one of these the first couple of years that I checkered, but when I finally got one I didn’t know how I lived without it. With a little practice it will be a go-to tool in your checkering arsenal.
Veiner: A veiner is a sharp “V” shaped gouge that is extremely sharp when sharpened properly. It is used for close-up areas near the border as well as cutting curved areas on borders and in Fluers. I’ve tried a few different brands and can only recommend the Ullman Precision one.
You’ll notice that there aren’t any line spacing tools listed. That is because it is nearly impossible to match up the Lines-Per-Inch(LPI) on an existing checkering pattern. Single-line cutters are all that is needed to recut a checkering pattern.

How to Recut Checkering on a Gunstock
One line at a time.
It is just that. Recutting a checkering pattern is done by tracing over every single line multiple times until the desired result is achieved. Work in one direction at a time, as shown above. For most recutting jobs, you won’t go to full depth on the first pass. You will work to the desired depth using multiple passes going in each direction.
Work close to the border, avoiding any overruns or places where your line extends past the border. This involves switching between tools occasionally. As previously mentioned, the right angle cutters work best up close to the border on the pull stroke. Carefully bring the cutter up to the border and pull the cutter back towards the rest of the pattern.

I like to cut the borders last. This creates a clean and sharp look at the border, making it look professionally done. Work on one panel at a time and rest your eyes frequently. Don’t get frustrated if it isn’t turning out perfectly. It rarely does.
Applying Finish to the Checkering
The last step when recutting a checkering pattern is to apply a finish to it. This can vary depending on what the existing finish is on the stock, but typically is some sort of oil-based finish like linseed oil. As a general rule, when applying finish to checkering, it should be thin so that it doesn’t build up at the bottoms of the diamonds.
Adding mineral spirits is a great way to thin the finish that you are using. Using a small cup, add a little to your oil until you get a thin consistency to your oil. This works for just about every oil finish that you will want to use.
To apply the thinned finish, there are a few tools that I have used with success. An acid brush, small paint brush, or toothbrush works great for this and allows you to get the finish into the bottom of the pattern without any issue.
I prefer an old toothbrush over an acid brush for the simple reason that the toothbrush rarely leaves behind bristles. A cotton swab can also be used to apply finish to checkering but will sometimes leave a fuzz behind that can be hard to remove from the diamonds.
When using a thinned finish, apply multiple coats until satisfied. If you add too much and it begins to build up on the bottom of the pattern, wait for it to dry completely and make one more light pass with your checkering tool to remove the build-up.
Final Recommendations
This is not easy! Becoming good at checkering takes time and patience. Take your time, and don’t rush. I highly recommend practicing on the old stock that has no meaning to you before attempting to rechecker your prized hunting rifle. Old broken stocks are perfect for this.
Lastly, it is nearly impossible to recut checkering to be “Perfect.” Recutting checkering means that you will be recutting the mistakes from the original pattern as well as adding your own. These are out of your control for the most part, so don’t beat yourself up over it. Recutting checkering is very satisfying and can really give your old rifle the facelift that it deserves.
This isn’t all you need to know. Below is an article I wrote that covers much more about checkering. If you are serious about learning how to checker or rechecker a stock, this article will help you tremendously.
How to Start Checkering a Gunstock: The Fundamentals

Written by: Kurt Martonik
Kurt is a Gunsmith, Reloader, Hunter, and Outdoorsman. He grew up in Elk County, Pennsylvania, where he became obsessed with the world of firearms. Following high school, Kurt enlisted in the United States Air Force as a Boom Operator, where he eventually rose to the position of Instructor. After his military service, he attended the Colorado School of Trades(CST) in Lakewood, CO for gunsmithing. Following graduation, he accepted a job at C. Sharps Arms in Montana, where he worked as a full time stockmaker and gunsmith.
1 thought on “How to Recut Checkering on a Gunstock”
Comments are closed.